Recent breakthroughs in medical science have now conclusively demonstrated that a significant amount of hip and back discomfort from arthritis is caused by muscle weaknesses in the abdomen and back. Many people associate strengthening “core” muscles as something that is of concern only to gym aficionados and professional athletes. Doctors now understand that anyone at any age can benefit from strengthening their “core” muscle groups as a proactive step in reducing or eliminating the pain associated with arthritis in the back and hips.
Abdominal, back, and gluteal muscles are used to augment and strengthen the skeletal system, providing balance and stability. When these muscles are strong and toned, they will both protect joints as well as relieve the amount of stress placed on the hips and back.
If you are suffering from discomfort related to arthritis in the back and hips or are concerned about developing pain in these fragile areas, the following seven exercises can help strengthen and tone those “core” muscles that will protect you and add balance and stability to the center of your body.
Note: as with all exercises, start off slowly and allow time for your muscles to warm up. Some mild soreness on the following day is normal but if you experience any stabbing or severe discomfort, discontinue the exercise immediately. Consult your doctor if the pain persists.
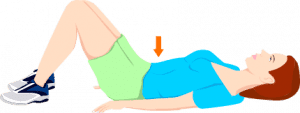
This exercise is particularly suited for improving the strength of your abdominal muscles.
- Start by lying supine (your back to the floor) with your arms loose and relaxed at your sides.
- Bend your knees while keeping your feet flat on the floor.
- Squeeze your abdominal muscles while slowly raising one leg about 3-4 inches off of the floor. Hold this position for five seconds and then slowly return the leg to the ground.
- Repeat the motion with the other leg.
- Continue to “march” by alternating each leg lift 5 times.
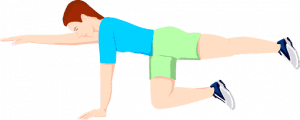
This exercise is great for improving the strength of your back muscles.
- Get on your hands and knees while making sure your back is parallel to the floor.
- Slowly raise one leg off the floor and extend it fully until it is parallel to the ground.
- Extend the opposite arm (i.e. left arm for right leg) out in front of you until it is parallel to the ground.
- Hold the position for 5 seconds and then slowly return to your hands and knees on the floor.
- Now extend the other leg and other arm.
- Repeat 5 times.
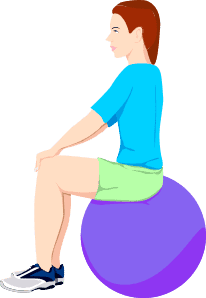
For this exercise, you’ll need an exercise ball. These are sold in many discount large-volume retailers (Wal-Mart, etc), sporting goods stores and online retailers. If you’re just starting out, we recommend using a ball that’s slightly deflated as it provides more cushioning and support.
- Sit on the exercise ball much as you would sit on a chair. Make sure your spine is straight, your hands on your knees, and your feet are flat on the ground.
- Without rocking or swaying, lift one foot off the ground about 2-3 inches.
- Hold your foot motionless for 3 seconds and then slowly return it to the floor.
- Continue to “march” by alternating feet until you have raised each foot five times.
A fantastic exercise that can safely help you improve your core muscle strength.
- Lie on the floor in the supine position (back to the floor) with your arms relaxed at your sides. Bend your knees to form a triangle with the ground.
- Clench your abdominal muscles and push your body center downwards towards the floor. This will cause your pelvis to slightly tilt upwards.
- Maintain this position for five seconds and then slowly unclench and relax your abdominal muscles.
- Repeat this five times.
Similar to a sit-up but far safer for your back, this exercise will help tone your abdominal muscles.
- Sit on your exercise ball with your feet on the floor. Now cross your arms over your chest.
- Slowly and carefully lean backwards until you feel your hips begin to rise. Continue to lean back until only your toes are touching the ground.
- Tighten your abdominal muscles and sit up straight without letting your feet leave the ground.
- Repeat this motion five times.
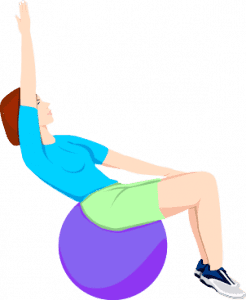
A great exercise for toning those small but important muscles that add strength and balance to your hips.
- Sit on your exercise ball with your feet flat on the floor.
- Raise both of your arms completely straight up.
- With your arms still in the air, slowly and carefully lean back until your heel lifts up off of the ground.
- Hold this position for five seconds.
- Slowly put one arm on your opposite knee, followed by the other arm.
- Repeat 10 times.
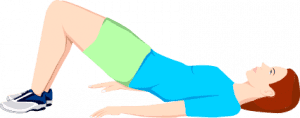
If you’re just starting out, be careful to do this exercise slowly and carefully.
- Lie supine on the floor (back to the ground) with your arms at your side, hands down flat.
- Bend your knees until your leg forms a triangle with the ground.
- Use your abdominal muscles to lift your buttocks off of the floor until your body is in a straight line from your knees to your shoulders.
- Hold the position for 10 seconds and then slowly lower your body to the starting position.
- Repeat 5 times.